DIY Hardscape Design: Your Complete Guide to a Stunning Yard
Transform your yard with our complete guide to DIY hardscape design. Learn practical steps to plan, design, and build beautiful patios, paths, and walls.
A great hardscape project doesn't start with a shovel—it starts with a solid plan. Thinking through your vision and translating it into a practical, buildable blueprint is the secret to avoiding costly mistakes and creating a space you'll actually love to use. This is where you assess your site, define your goals, and sketch a layout.
Laying the Groundwork for Your Hardscape Project
Jumping straight into construction is a surefire way to end up with a lopsided patio or a path that leads nowhere useful. The most successful and rewarding DIY projects always begin with careful observation and clear intentions. It's all about truly understanding the canvas you're working with—your yard—and deciding what you want to create on it.
Think of this phase as your roadmap. It will guide every decision you make, from the pavers you choose to the final placement of your fire pit, making sure every piece works together.
Get to Know Your Yard: The Site Assessment
Before you start dreaming up a multi-level patio with an outdoor kitchen, you have to get real about your yard's quirks. A thorough site assessment helps you spot potential headaches before they become expensive problems. Grab a notepad and walk your property, paying close attention to these critical factors:
- Sun and Shade: Where does the sun hit and when? A patio meant for sunbathing is useless if it's stuck in the shade all afternoon. Note how the light changes throughout the day.
- Slope and Drainage: After a good rain, where does the water go? Puddles are a red flag. A slight slope away from your house is a good thing, but a significant grade toward your foundation is a major issue your design must address.
- Existing Features: You need to map out any trees, mature shrubs, or structures that are staying put. You'll have to work around them and their root systems.
- Utility Lines: This is the one thing you can't guess on. Before you even think about digging, call 811. Hitting a buried gas or water line is a dangerous and entirely avoidable mistake.
What’s the Goal? Defining Your Hardscape’s Function
With a clear picture of your site, it’s time to ask the most important question: what do you want this space to do? A beautiful patio that doesn't fit your lifestyle is just a bunch of expensive stones.
Think about how you'll really use it:
- The Entertainer's Hub: If you’re the go-to house for barbecues, you’ll need a generous patio to fit a grill, a large dining set, and extra seating. Think about flow from the kitchen to the grill.
- The Quiet Retreat: Maybe you're craving a peaceful escape. Your design might focus on a small, secluded patio just big enough for a bistro table, surrounded by garden beds.
- The Family Play Zone: For a family with kids, you'll want durable surfaces, a dedicated fire pit area for s'mores, and maybe a low retaining wall that doubles as extra seating.
Start Sketching Your Layout
You don't need to be a landscape architect for this part. Grab some graph paper and start with a simple bird's-eye view of your property. Mark the house, property lines, and existing features. Now, start playing with shapes. Draw in where you imagine the patio, walkways, and garden walls. Is the path from the back door to the new patio natural? Is the fire pit a safe distance from the house? Sketching lets you make changes for free, on paper, instead of with a pile of misplaced pavers. For more inspiration, check out the OutdoorBrite blog.
See It Before You Build It: Using AI to Visualize Your Design

One of the biggest hurdles with a DIY hardscape design is bridging the gap between the idea in your head and how it will actually look. It’s hard to know if you'll love the final result, which can lead to hesitation or expensive mid-project changes.
Thankfully, AI-powered visualization tools have become a go-to for savvy DIYers, letting you take ideas for a virtual test drive. Imagine snapping a photo of your empty backyard and moments later scrolling through dozens of professional design concepts tailored to your space. That's precisely what tools like OutdoorBrite do, cutting out the guesswork and giving you confidence.
Getting started is simple:
- Snap a Photo: Take a clear picture of the area you want to tackle.
- Pick a Vibe: Choose from a library of design styles, from sleek modern to cozy cottage.
- Get Your Concepts: The AI generates multiple, realistic redesigns based on your photo and style.
This gives you immediate, powerful feedback, showing different layouts and material combinations in the context of your home. This shift is part of a larger trend, with the US landscape design industry projected to become a USD 9.3 billion market by 2025.
A Risk-Free Sandbox for Your Ideas
AI visualization is a practical tool for nailing down the details. This is your chance to experiment with materials and see what works with your home's exterior. Torn between dark slate pavers and natural flagstone? Generate a version with each and compare them.
You can see the whole picture:
- Seasonal Views: Preview your patio surrounded by fall colors or summer greens.
- Different Lighting: Check out your space at high noon versus dusk to plan for landscape lighting.
- Plant Pairings: See how different plants will soften the edges of your hardscape, perhaps testing bold looks like these island landscaping ideas.
By running through variations in minutes, you can fine-tune everything before spending a dime on materials. This is how you prevent "I wish I had..." moments. A tool like this turbo-boosts your creativity, letting you build, tear down, and rearrange your dream hardscape with zero risk.
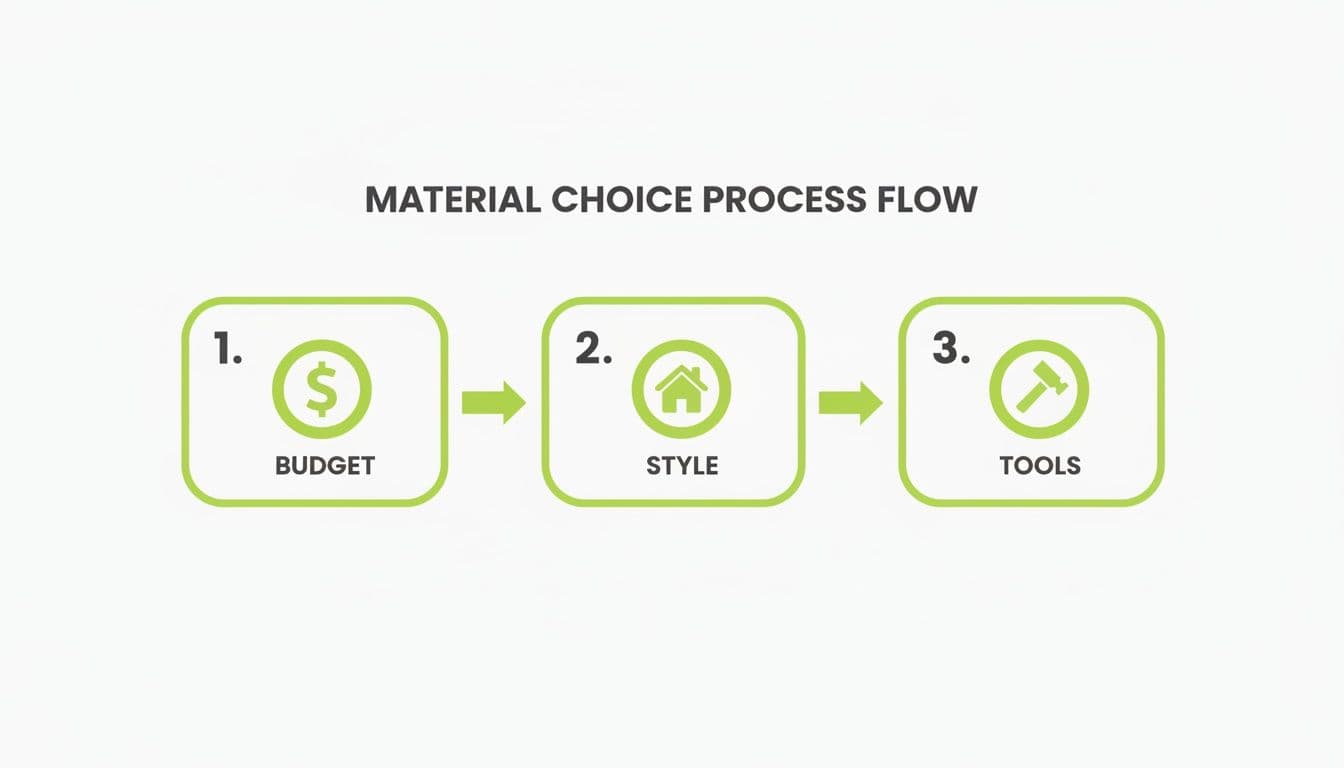
Choosing the Right Hardscape Materials and Tools
Picking out your materials is one of the best parts of any diy hardscape design. Your choice here sets the entire tone for your outdoor space. The home improvement market is booming—projected to grow from USD 843.05 billion to USD 1,181.58 billion by 2033. For us, that means an incredible selection of materials and pro-grade tools are now readily available. You can dive deeper in this full home improvement market analysis. All that choice can feel overwhelming, so let's walk through the most common options.
Hardscape Material Comparison Guide
Every material has a distinct personality and its own demands. Look past the initial "wow" factor and think about the long-term relationship you'll have with your patio or walkway.
| Material | Average Cost (per sq. ft.) | Durability | DIY Difficulty | Best For |
|---|---|---|---|---|
| Concrete Pavers | $4 - $8 | High | Moderate | Patios, walkways, driveways |
| Natural Stone | $15 - $30+ | Very High | High | Patios, stepping stones, accent walls |
| Brick Pavers | $5 - $10 | High | Moderate | Formal paths, traditional patios |
| Gravel/DG | $1 - $3 | Moderate | Low | Informal paths, fire pit areas, side yards |
A high-traffic patio needs something tough like pavers, while a simple garden path is perfect for gravel. A great rule of thumb is to match the hardscape to your home's architecture.
Gearing Up: Your Essential Tool Checklist
Having the right tools makes all the difference. You don’t have to buy a workshop's worth of equipment; renting big items is a game-changer.
Must-Haves (The "Buy It")
- A solid wheelbarrow.
- Good shovels—one flat-nosed and one pointed.
- A heavy-duty garden rake.
- A 4-foot level for getting the slope just right.
- String line and stakes.
- A quality tape measure and a rubber mallet.
- Safety gear: gloves, safety glasses, and steel-toed boots are non-negotiable.
Heavy-Hitters (The "Rent It")
- Plate Compactor: If you rent only one thing, make it this. A compacted base is the single most important factor in preventing your patio from sinking.
- Masonry Saw (Wet Saw): Essential for making clean, precise cuts on pavers or stone for edges and curves.
- Sod Cutter: Planning to tear out a big patch of lawn? This machine will save your back and hours of labor.
Choosing the right materials and tools before you start digging is a true pro move. It sets you up for a build that's successful and rewarding.
How to Build Your Own Patio, Path, and Retaining Wall
With a solid design and materials on deck, it’s time to bring your diy hardscape design to life. All that careful planning is about to pay off. The global landscaping products market hit USD 88.64 billion in 2024 and is expected to climb to USD 129.98 billion by 2030, with hardscaping leading the charge. A well-designed hardscape can slash yard maintenance by up to 50%. You can dig into the numbers at Grandview Research. Let's break down the practical steps for building the most common projects.
Constructing a Durable Paver Patio
A gorgeous paver patio that sinks after one season is usually the result of a poorly prepared base. Getting this foundation right is crucial. For a typical paver patio, excavate 7 to 9 inches deep. This space holds 4 to 6 inches of compacted gravel, a 1-inch layer of sand, and the pavers.
- Compact the Subgrade: The soil at the bottom needs to be rock-solid. Rent a plate compactor and run it over the entire excavated area.
- Build the Gravel Base: Add your crushed stone in 2-inch lifts. Compact each layer thoroughly before adding the next. This prevents future settling.
- Screed the Sand Bed: Lay pipes across your gravel base and pour paver sand between them. Drag a straight 2x4 across the pipes to create a perfectly smooth bed.
- Lay the Pavers: Start in a corner and work your way out. Place each paver straight down into the sand—don’t slide them. A gentle tap with a rubber mallet will set them.
A successful build sits at the intersection of your budget, your style, and your skillset.
Creating a Simple and Effective Garden Path
A garden path follows the same principles as a patio but is much simpler. For a gravel or stepping stone path, digging 4 to 5 inches is often enough. For a gravel path, laying down high-quality landscape fabric after clearing the area is non-negotiable to keep weeds from poking through. Install your edging to contain the gravel, then pour and rake it to a depth of 2 to 3 inches.
Pro tip: Avoid large, rounded gravel for walking paths. It feels like walking on marbles. Stick to angular crushed rock that’s 3/8-inch or smaller, as the pieces lock together for a more stable surface.
Building a Basic Retaining Wall
Retaining walls tame slopes and create usable flat space, but they must be built tough. For a DIY project, keep your wall under 3 to 4 feet high. Taller walls usually require an engineer and a permit.
- Dig a Trench: Your trench should be twice as wide as your wall blocks and about 6 inches deep.
- Create a Leveling Pad: Fill the trench with 4 to 5 inches of compacted gravel for a solid, level base.
- Set the First Course: This is the most crucial layer. Use a level on every single block to ensure it's perfect. If this row is off, your entire wall will be crooked.
As you stack the next layers, stagger the joints like brickwork for strength. Most modern blocks automatically step back with each course, helping the wall lean into the hill. Finally, don't forget drainage. Fill the space behind the wall with gravel before adding topsoil to prevent pressure buildup.
Getting Your Ducks in a Row: Budget, Permits, and Long-Term Care
A successful DIY hardscape project isn’t finished when the last stone is set. The real win comes from a project that stays on budget, avoids issues with local inspectors, and looks fantastic for years. Handling the logistics—budgeting, permits, and maintenance—is what separates a great experience from a stressful one.
Nailing Down a Realistic Project Budget
Your budget is more than just the cost of pavers. Homeowners often forget about the "little" costs that add up. A solid budget anticipates everything.
Add these often-overlooked expenses to your spreadsheet:
- Delivery Fees: Getting tons of aggregate or stone delivered is a must, and it’s never free.
- Tool Rentals: The daily or weekly cost for a plate compactor or masonry saw needs to be in the budget from day one.
- Waste Removal: Look into the cost of renting a small dumpster for the dirt and sod you dig up.
- Contingency Fund: Always add 10-15% on top of your total estimated cost. This buffer is your safety net for unexpected needs.
Navigating Building Permits and Local Codes
Ignoring permits is a huge gamble. Your local town has specific rules, especially for retaining walls or large patios that affect water drainage. Building without a required permit can lead to fines or an order to tear it all down.
Call your local building department or visit their website to ask about:
- Retaining Wall Height: Most places require a permit for any wall over 3 or 4 feet tall.
- Setbacks: There are always rules about how close you can build to your property lines.
- Impervious Surface Limits: Some towns limit the percentage of your lot that can be covered by non-porous surfaces.
Taking an hour to check these rules is a smart investment that buys you peace of mind.
Long-Term Hardscape Maintenance and Care
A little routine care will keep your project looking its best. The good news is, hardscapes are incredibly low-maintenance compared to a lawn.
Your annual checklist should look like this:
- Cleaning: A scrub with a stiff brush and paver cleaner each spring gets rid of winter grime. If you use a pressure washer, keep it on a low setting.
- Weed Prevention: Weeds grow in the sand between pavers. Regularly sweep the joints and top off the polymeric sand every few years.
- Seasonal Inspections: In the spring, walk around your patio and look for any settled pavers. You can usually just lift them, re-level the spot with sand, and set them back in place.
If you have specific questions, don't hesitate to contact the OutdoorBrite team for guidance.
Your Hardscape Questions, Answered
Every DIY hardscape project comes with its own set of questions. Let's tackle some of the most common ones so you can build with confidence.
How Do I Keep My Patio from Turning into a Pond?
Water is the enemy of a long-lasting hardscape. The secret is building a subtle slope into the patio from the start. You’re aiming for a 1/4-inch drop for every foot the patio extends away from your house. This gentle grade is almost invisible but is enough to guide rainwater away. You create this slope during the base prep phase.
What's the Single Biggest Mistake DIYers Make?
Cutting corners on the base preparation. It's tempting to rush to the "fun" part of laying pavers, but skimping on the foundation is the fastest way to ruin your project.
A weak or shallow base is the number one cause of failed hardscapes, leading to sunken spots and shifting pavers. Don't make this mistake. For a patio, you need to excavate at least 6-8 inches and compact your gravel base in 2-inch layers. No shortcuts.
Can I Really Build a Retaining Wall Taller Than 4 Feet?
My professional advice? Absolutely not. This is where you call in a pro. Most building codes mandate that any wall over 3 or 4 feet must be designed by a licensed engineer. This isn't just red tape—it's a critical safety issue. Taller walls hold back an incredible amount of force and require specific reinforcement and engineered drainage to prevent a catastrophic collapse.
Ready to stop guessing and start seeing? With OutdoorBrite, you can visualize your perfect hardscape design right in your own yard before you ever break ground. Turn your ideas into photorealistic concepts in seconds and build with total confidence. Start your AI-powered design today at https://www.outdoorbrite.com.
See your yard reimagined
A design studio in your pocket. Bring your yard ideas to life in seconds.